Healing Level I
TREATMENT OUTLINE - CHIOS LEVEL I
(Steps of a Typical Treatment)
Treatment Atmosphere:
Now that you have learned to channel and sense the energy, it is time to begin to give complete healing treatments. Right from the start, however, you should learn to give each treatment in an atmosphere that is genuinely beneficial to your patient. Be sure to conduct each treatment in the proper setting and manner. Healing treatments should take place in a peaceful, restful, calm and supportive environment. It is important that your patient be lying down, and warm and comfortable. You should have a massage table of the proper height (it is virtually a necessity for this type of healing). Some patients enjoy having music playing softly in the background, yet make sure this does not distract you from giving an effective treatment. During the treatment you should maintain an air of calm and confidence, and above all an interest in nurturing the person you are treating. Healing is an act of nurturing, done to aid another human being. Generally, it is best not to carry on a "busy" conversation while healing, but it is acceptable to share a few words to the person if you feel it is beneficial during the treatment.
It will often be that your patient will enter into a calm, peaceful and relaxed state during treatment and perhaps have experiences of expanded awareness. It is also possible, on occasion, that energy healing treatments may manifest experiences or memories of past traumas, repressed emotions surfacing, physical symptoms, or other things unpleasant to your patient which sometimes accompany the personal healing process. These disturbances in the body or mind of your patient cannot be predicted or controlled by you the healer. It is your responsibility at these times, however, to be a present and compassionate supporter and yet not become "wrapped up" in whatever is coming up—to maintain the openness and clarity necessary for healing while acknowledging and encouraging your patient to express and embrace whatever thoughts, emotions or sensations may appear during treatment. It is also possible for your patient to have peak experiences, unusual or extraordinary experiences in consciousness, and you can again act in an affirming and supportive role.
Calling In the Energy:
To begin a treatment, you must first summon the energy, requesting that it begin to flow. Stand by yourself for a moment, close your eyes and begin to see and feel the energy flowing into you from all around you, into your body. See the energy filling your body, and then moving to your shoulders, and down through your shoulders and arms, and down into your hands, filling them like water filling a glove. Really see the energy coming in, flowing through you and building in your hands. Do not try to "force" the energy, just see it effortlessly building in this way, as you have practiced. Release yourself to the energy.
Passing the Hands:
For a few brief moments, before laying on the hands, pass your hands over your patient to gain some idea of the condition of their energy field. Move your hands, slowly, over the front of the body, from the top of the head all the way down to the feet, with your open palms about 4 or 5 inches away, using one hand at a time. Relax your hands as you do this, and be open to sensations in them. What do you feel? Are there certain chakras that you sense are going to need extra energy during this treatment? Are there certain other areas in which you feel an energy disturbance of some sort: a "bump," a "dip," a hot or cold feeling? Are your hands drawn to certain areas, or are their certain areas you have sensed something and have received the impression that they are in need of special treatment? You may wish to make note of all such areas, later giving special attention to them during treatment by conducting extra energy to them, if you feel it is required. You should also be aware of any intuitive information you receive about these areas, as you pass the hands over them. Your patient may also find this passing of hands quite soothing.
The Normal Sequence of Treatment Hand Positions:
After practicing the passing of hands, begin to channel energy to each of the chakras, in the sequence of treatment hand positions shown below. We refer to this sequence as the normal sequence of treatment hand positions, and you will often be following it in your healing treatments. Begin this energy channeling, as you have learned to do above. It is important to use the proper hand position on each chakra. In each of the positions shown, keep your hands relatively open and flat, with fingers together but relaxed, and remember to use zero pressure. In each treatment hand position, be open and aware of the energy flow. Can you sense when the energy flow builds, and then diminishes, in each chakra? How much energy does each chakra draw—do some “want” more energy than others?
Relax and allow yourself to feel the energy flow through your hands as you treat each chakra, until you feel the flow diminish or until you gain a sense of completeness. This will inform you when it is time to move to the next chakra position. You will often find yourself treating each chakra for three to five minutes, but this will vary, because some chakras will need more of the energy than others. As you work, allow yourself to begin to gain a sense of how the energy is flowing through you and through your patient. Begin to “tune in” to your patient’s energy field. What are you sensing or feeling about your patient? Suspend your rational thinking process and simply be aware, and allow impressions to come to you. Healing is best done in a state of openness and holistic awareness. All you must do to access this state is to set yourself free and release yourself to the energy and the healing taking place.
You will notice that the 1st chakra is not treated in this basic standard treatment. This is because to do so would require placing the hands directly on the genital region. In energy healing the hands are never placed on or near the genital region as this might disturb, offend or cause psychological discomfort to your patient. In later Chios® levels you will learn techniques to correct the common energetic defects that may occur in the 1st chakra.
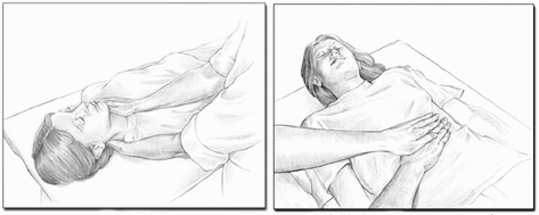
7th Chakra:
Stand at the head of the treatment table. Place your hands, not on the very top of the head, but on the top sides of the head, with your fingers pointing downwards. This provides for maximum stimulation. The hands should not be too far apart, perhaps with a gap of 2 to 3 inches between the little fingers. Conduct the energy, easily and effortlessly, into this chakra.

7th Chakra (Left) and 6th Chakra (Right)
6th chakra:
Move to the side of the treatment table (almost all healers will find the patient's right side the best side to work from, for the rest of the healing treatment). Center your right palm between and just above the eyebrows. At the same time, place your left palm underneath the head, centering it, not directly underneath, but between the back of the head and the neck, just below the curve of the back of the head. Conduct the energy to this chakra. You are treating both components at the same time, one with each hand. This will require you to stand to the patient's side, usually the right side, for this and the following chakra positions.
5th chakra:
Center your right palm over or just above the pit in the throat, and your left palm below the base of the neck, underneath the patient and directly back from the front palm. Conduct the energy as before.
5th Chakra (Left) and 3rd Chakra (Right)
4th chakra (front component):
Center your right palm directly between the breasts (between the nipples), and then place your left hand alongside your right hand, and just above it on the patient's body, so that they gently overlap (just thumbs, or thumbs and index fingers may overlap). If you are a male healer treating a woman, you will have to use care, and vary hand positions somewhat to show courtesy, but try to keep the right palm centered over the chakra. Now conduct the energy. You are just treating the front component of this chakra—you will treat the rear component later.
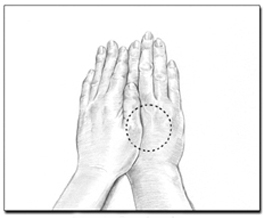
Hands Overlapping (4th, 3rd and 2nd Chakras)
3rd chakra (front component):
Center your right palm at a point about half way between the depression at the bottom of the sternum and the navel. This will be several inches above the navel. Place your left hand just above the right, with them gently overlapping, as before. Conduct the energy.
2nd chakra (front component):
Center your right palm at a point about half way between the navel and the protruding front portion of the pubic bone (which is at the top of the genital region). Place your left hand just above the right, and gently overlapping.Conduct the energy.
Arms and Legs:
Skip this step when first learning—It is most important to treat the chakras. Later, after you have gained some experience, your patient will also benefit from treatment of the arms and legs if you wish to do so or feel it would be beneficial. Begin with the right arm, placing your right palm on the inside of the elbow joint, left palm on the outside. Proceed around the treatment table, in either direction, using your right palm on the inside portion of each limb joint (elbows and knees), your left palm on the outside.Conduct the energy.
Supplemental Areas:
Again, skip this step when first learning. Later, after a little experience, your patient will benefit from treatment of any special areas that you sensed in the aura using the passing of hands at the beginning of the treatment. Place your hands directly over these areas in the same manner as with a chakra, the right palm centered over the area, with the left hand gently overlapping the right hand. You may also sense with your intuition, during treatment, additional areas that would benefit from treatment. Treat all such areas accordingly. In all such positions, allow yourself to be open to sensing the flow of energy—where it may be going—and to information on what the patient's condition in that area may be.
In addition, you may also at this time wish to treat any area in the patient's body where injury, illness or disease are present. Place your hands directly over, or adjacent to, the affected area. See "Precautions and Special Situations," below, for some suggestions for situations you may encounter.
2nd chakra (rear component):
Ask your patient to turn over, so that they now lie on their stomach. Remain on the same side of the treatment table as before. Now center your right palm on the 4th or 5th lumbar vertebra (1 or 2 vertebra up from the sacrum), and place your left hand just above the right hand, gently overlapping. Conduct the energy.
3rd chakra (rear component):
Imagine, first, where the rear component of the 4th chakra is (directly in back of the body from the front component), then center your right palm about half-way between this point and the point where you treated the rear component of the 2nd chakra. Then place your left hand just above your right, gently overlapping. Conduct the energy.
4th chakra (rear component):
Center your right palm at a point directly in back of the body from the front component. Place your left hand just above your right, gently overlapping. Conduct the energy.
Ending Treatment:
End the treatment by standing by yourself for a quiet moment, and requesting that the energy stop flowing. It is a quieting. See it stop its flow into your body, then stopping its flow through your hands. Feel a sense of completeness, and perhaps give a moment of thanks in your heart.
The chakra locations given above are a general guideline for you to use while learning. As you become more proficient at the passing of hands, you will actually acquire the ability to “feel” the exact position of the chakras of your patient, and it is ideal to use that information to center your hands more precisely over each chakra during the treatment hand positions, to maximize the energy flow. The precise positions on the human body that correspond to the chakras may vary from person to person, as each person is unique.
The large majority of healers will find it comfortable to employ the hand positions described above, centering the right palm over the chakra. The right hand is generally a little more active and more attuned to the energy flow. This is true for nearly all healers—whether right or left-handed—and so to place your right palm directly over the chakra position almost always provides maximum stimulation. If, however, you find yourself continuously uncomfortable using this arrangement, try modifying the hand positions above to center your left palm over each chakra. Your right hand will then either be underneath your patient’s body (for the 6th and 5th chakras), or gently overlapping your left hand (for the other chakra positions).©1994 - 2011 Stephen H. Barrett